How Long to Cook Ribs in Oven at 350°F?
Get ready to tantalize your taste buds with the irresistible flavors of oven-cooked ribs. Wondering how long to cook ribs in an oven set at 350 degrees? Look no further! In this guide, we’ll show you how to achieve perfectly tender and juicy ribs using just your trusty oven.
Cooking broiler ribs at a consistent temperature of 350 degrees for the recommended baking time offers a convenient way to infuse them with delectable flavors. Whether you’re hosting a backyard barbecue or simply craving some mouthwatering goodness, these recipes will have you covered. Say goodbye to guesswork and hello to succulent ribs that will leave everyone begging for more. Remember to use a read thermometer for accurate results.
So, fire up that degree oven and let’s dive into the art of cooking ribs that are sure to impress. Get ready for a finger-licking experience like no other!
Choosing the Right Rib Style: Country-Style vs. St. Louis-Style Ribs
Understand the differences between country-style and St. Louis-style ribs.
It’s essential to choose the right rib style that suits your taste preferences. Two popular options are country-style and St. Louis-style ribs. While both types come from the same animal, they differ in their preparation, cut, and flavors.
Country-style pork ribs are meaty and typically cut from the shoulder end of the pig. They have more pork meat compared to other rib styles, making them a fantastic choice for those who enjoy hearty portions of pork. These pork ribs contain a lot of fat marbling, which contributes to their tenderness and rich flavor when cooked low and slow in the oven.
On the other hand, St. Louis-style ribs originate from spare ribs but undergo further trimming to remove cartilage and breastbone sections. This process results in a rectangular-shaped rack that is uniform in size and appearance. The trimmed St. Louis-style ribs cook more evenly than spare ribs and offer a perfect balance between meatiness and tenderness.
Find out which rib style suits your taste preferences.
To determine which rib style is best for you, consider your personal taste preferences:
- Meatiness: If you prefer a substantial amount of meat on your ribs, country-style is an excellent choice due to its generous portions.
- Tenderness: For tender and succulent ribs that fall off the bone effortlessly, both styles can deliver exceptional results if cooked correctly.
- Flavor: Country-style ribs have more fat content, resulting in a richer flavor profile when slow-cooked in the oven at 350 degrees Fahrenheit.
- Size: If you’re looking for uniformity in size for presentation purposes or even cooking time, opt for St. Louis-style ribs with their trimmed and consistent shape.
Make an informed decision when selecting the perfect rib style for your oven-baked dish.
When choosing between country-style and St. Louis-style ribs, it’s essential to consider the specific dish you plan to prepare. Here are some suggestions for each rib style:
Country-Style Ribs:
- Ideal for slow cooking methods like braising or roasting.
- Perfect for pork dishes that benefit from the richness of fat marbling, such as barbecue pork ribs or sticky glazed pork ribs.
- Can be seasoned with dry rubs or marinades to enhance their flavor profile.
St. Louis-Style Ribs:
- Well-suited for grilling, smoking, or oven baking due to their uniform size and shape.
- Great option for those who prefer a balance between meatiness and tenderness when cooking pork ribs, short ribs, and spare ribs.
- Works well with various sauces and rubs, allowing you to experiment with different flavors.
Perfecting Oven-Baked Ribs: Easy Fall-Off-The-Bone Method
Master the art of achieving fall-off-the-bone tenderness with oven-baked ribs. Follow a simple method that guarantees perfectly cooked ribs every time. Impress your guests with unbelievably tender and flavorful oven-baked ribs.
The Boneless Advantage
Using boneless cuts can offer several advantages. Boneless ribs tend to cook more evenly and quickly compared to their bone-in counterparts. This is because the absence of bones allows for better heat distribution throughout the meat, resulting in a more consistent texture.
To begin, preheat your oven to 350°F (175°C). While the oven is heating up, prepare your boneless ribs by removing any excess fat or silver skin. Season them generously with your favorite dry rub or marinade, making sure to cover all sides for maximum flavor.
The Easy Method
Once your ribs are seasoned and ready to go, it’s time to cook them in the oven. Place the ribs on a wire rack set inside a baking sheet lined with aluminum foil or parchment paper. This setup helps promote airflow around the meat, allowing it to cook evenly and preventing it from becoming too soggy.
Slide the baking sheet into the preheated oven and let the magic happen. Cooking times will vary depending on various factors such as rib thickness and personal preference for doneness. However, as a general guideline, you can expect boneless ribs cooked at 350°F (175°C) to take approximately 1 hour.
Fall-Off-The-Bone Tenderness
The secret behind achieving fall-off-the-bone tenderness lies in low and slow cooking. To ensure your ribs turn out melt-in-your-mouth tender, consider using an additional step known as “braising.” This involves wrapping the seasoned ribs tightly in aluminum foil before placing them on the wire rack.
Braising helps create a moist cooking environment, allowing the ribs to slowly tenderize as they cook. After the initial hour of cooking, reduce the oven temperature to 300°F (150°C) and continue baking for an additional 1-2 hours. The longer cooking time will break down the connective tissues in the meat, resulting in that sought-after fall-off-the-bone texture.
Flavorful Options
While this easy method guarantees tender ribs, you can take your flavor game up a notch by experimenting with different marinades or glazes. Consider brushing on a tangy barbecue sauce during the last 15 minutes of cooking for a deliciously caramelized finish. Alternatively, you can opt for a sweet and savory honey mustard glaze or even a spicy chipotle rub for some extra kick.
Remember to let your cooked ribs rest for a few minutes before slicing into them. This allows the juices to redistribute throughout the meat, ensuring every bite is moist and flavorful.
Achieving Tender Oven-Baked Ribs: Common Misconceptions
There are several common misconceptions that can lead to disappointing results. To ensure your ribs come out tender and delicious every time, it’s important to debunk these myths and avoid the pitfalls that can result in tough or dry meat.
Debunking Common Misconceptions
- High heat is better for tender ribs: Many people believe that cranking up the oven temperature will speed up the cooking process and yield more tender ribs. However, this is not the case. Cooking ribs at a lower temperature allows the connective tissue in the meat to break down slowly, resulting in a more tender texture.
- Boiling before baking: Some recipes suggest boiling ribs before baking them in the oven to achieve tenderness. While this method may expedite cooking time, it can also rob the meat of its natural flavors and juiciness. Instead, opt for slow roasting at a low temperature for succulent results.
- Skipping the pre-cook step: It’s crucial to pre-cook your ribs before placing them in the oven if you want them to turn out tender. This step helps render excess fat from the meat and ensures even cooking throughout.
Avoiding Pitfalls for Tender Ribs
- Don’t rush: Low and slow is key: Achieving tender oven-baked ribs requires patience. Set your oven temperature to 350°F (175°C) and allow enough time for the connective tissue to break down gradually while infusing flavors into the meat.
- Use cold water: A quick trick: Before seasoning your ribs or placing them in the oven, give them a quick rinse under cold water. This helps remove any bone fragments or debris that might be clinging onto them.
- Container matters: Choose wisely: When preparing your ribs for the oven, choose a suitable container. A baking dish with high sides or a roasting pan can help retain moisture and prevent the ribs from drying out.
Expert Tips for Maximum Tenderness
- Wrap in foil: Locking in moisture: After seasoning your ribs, wrap them tightly in aluminum foil before placing them in the oven. This technique helps lock in moisture and promotes even cooking, resulting in tender meat.
- Low and slow basting: Infuse flavor: Baste your ribs with a flavorful sauce every 30 minutes while they cook. This not only adds an extra layer of taste but also helps keep the meat moist throughout the cooking process.
- Finishing on high heat: Crispy exterior: To achieve that sought-after crispy exterior while maintaining tenderness, finish off your oven-baked ribs under the broiler for a few minutes after they are fully cooked. Keep an eye on them to prevent burning.
By debunking common misconceptions and following these expert tips, you’ll be well on your way to achieving tender oven-baked ribs that will have everyone coming back for seconds. So next time you’re craving perfectly cooked ribs, remember to take it slow and savor the delicious results!
Delicious Oven-Baked Ribs Recipe: Step-by-Step Guide
Are you craving delicious, fall-off-the-bone ribs but don’t have access to a grill? No worries! We’ve got you covered with our foolproof oven-baked ribs recipe. Follow our simple steps and discover the secret ingredients that will elevate your ribs to perfection.
Foolproof Steps for Mouthwatering Ribs
- Start by preheating your oven to 350°F (175°C). This is the optimal temperature for cooking tender and juicy ribs.
- Prepare the ribs by removing the membrane from the back of each rack. This step is crucial as it allows for better seasoning penetration and ensures maximum tenderness.
- Season the ribs generously with a dry rub mixture. You can create your own blend using ingredients like brown sugar, paprika, garlic powder, onion powder, salt, and pepper. Massage the seasoning into every nook and cranny of the meat for maximum flavor.
- Wrap each rack tightly in aluminum foil to create a sealed packet. This helps lock in moisture during the cooking process, resulting in incredibly tender ribs.
- Place the foil-wrapped racks on a baking sheet or roasting pan and transfer them to the preheated oven.
- Cook the ribs at 350°F (175°C) for approximately 2 hours. The low and slow cooking method ensures that they become fork-tender while allowing flavors to develop.
- After 2 hours, carefully remove the foil from each rack and brush them generously with your favorite barbecue sauce or glaze.
- Increase the oven temperature to 400°F (200°C) and return the uncovered ribs to cook for an additional 15-20 minutes until they achieve a beautiful caramelized finish.
- Once cooked, allow the ribs to rest for a few minutes before slicing them into individual portions.
Elevate Your Ribs with Secret Ingredients
Now that you know the simple steps to achieve mouthwatering ribs, let’s talk about the secret ingredients that will take your oven-baked ribs to the next level.
- Apple Cider Vinegar: Adding a splash of apple cider vinegar to your dry rub or barbecue sauce can enhance the tanginess and balance the flavors.
- Liquid Smoke: If you’re missing that smoky flavor typically achieved on a grill, liquid smoke is your savior. Just a few drops will infuse your ribs with that irresistible smokiness.
- Honey: For those who enjoy a touch of sweetness, drizzling honey over the ribs during the last few minutes of cooking will create a sticky glaze that caramelizes beautifully.
Create Memorable Dining Experiences
Cooking up a batch of homemade baked ribs isn’t just about satisfying your cravings; it’s an opportunity to create memorable dining experiences for yourself and loved ones. Here are some essential techniques to elevate your rib game:
- Pairing Sides: Serve your succulent ribs with classic side dishes like coleslaw, cornbread, macaroni and cheese, or grilled vegetables for a well-rounded meal.
- Finger-Licking Sauces for Pork Ribs: Experiment with different barbecue sauces or make your own signature blend. From tangy and spicy to sweet and smoky, there’s a sauce out there for every palate.
Enhancing Your Baked Ribs Experience: Side Dishes and Tips for Success
Pairing delectable side dishes with your baked ribs can take your meal to the next level. Not only do these sides add variety and flavor, but they also complement the tender meat perfectly. To ensure a successful and satisfying dinner, here are some expert tips to enhance the flavor and presentation of your oven-baked rib dish.
Experimenting with Complementary Side Dishes
There are endless possibilities. You can unleash your creativity by experimenting with different flavors and textures that complement the meat’s savory taste. Here are some mouthwatering options:
- Baked Macaroni and Cheese: Indulge in a creamy casserole dish of macaroni smothered in melted cheese, creating a delightful contrast to the rich flavors of the ribs.
- Cornbread: Whip up a batch of fluffy cornbread muffins or a skillet of golden cornbread slices. The slightly sweet taste pairs exceptionally well with savory meats.
- Grilled Vegetables: Fire up the grill alongside baking your ribs and prepare an assortment of grilled vegetables such as zucchini, bell peppers, and onions. The charred edges add depth to the overall meal.
- Coleslaw: A refreshing side dish like coleslaw offers a crunchy texture that complements the tender meat perfectly while adding a tangy twist to each bite.
- Garlic Mashed Potatoes: Creamy mashed potatoes seasoned with garlic provide a comforting balance when enjoyed alongside succulent ribs.
Expert Tips for Flavorful Ribs
To ensure your baked ribs reach their full potential, consider these expert tips:
- Marinating: Before cooking, marinate your ribs overnight using a flavorful blend of herbs, spices, and sauces to infuse them with extra taste.
- Slow and Low: Cooking ribs at a low temperature, such as 350°F, for a longer time allows the meat to become tender and juicy. Patience is key!
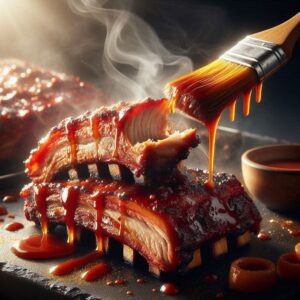
- Basting: Brushing your ribs with a tangy barbecue sauce or glaze during the last few minutes of baking adds an extra layer of flavor and creates a beautiful caramelized finish.
- Resting Period: Once your ribs are cooked to perfection, allow them to rest for a few minutes before serving. This helps retain their juices and ensures optimal tenderness.
Presenting Your Ribs
The presentation of your dish can elevate the overall dining experience. Consider these tips for serving and showcasing your delicious baked ribs:
- Garnish: Sprinkle some freshly chopped parsley or cilantro over the ribs to add a pop of color and freshness.
- Flanken Cut: Opt for flanken-cut ribs if you prefer shorter, cross-cut pieces that cook faster and offer an appealing visual appeal on the plate.
- Serving Platter: Choose an attractive platter or wooden board to showcase your mouthwatering ribs alongside the chosen side dishes.
By following these tips and experimenting with different side dishes, you can enhance your baked rib experience from start to finish. Whether it’s a casual dinner or a special occasion, these additions will surely impress your guests while satisfying everyone’s taste buds.
Reheating Ribs in the Oven: Time and Temperature Guidelines
Leftover ribs can be just as mouthwatering as freshly cooked ones if you follow the proper reheating techniques. To ensure your reheated oven-baked ribs maintain their original flavor and texture, it’s crucial to adhere to time and temperature guidelines. Avoid common mistakes that could lead to dried-out or overcooked ribs by following our expert advice.
Perfectly Timing Your Reheating Process
Timing is everything. The cooking time will vary depending on factors such as the thickness of the meat and whether it was previously refrigerated or frozen. Here are some general guidelines to help you achieve succulent results:
- Preheat your oven: Begin by preheating your oven to a low temperature, around 250 degrees Fahrenheit (121 degrees Celsius).
- Prepare the ribs: If your leftover ribs were stored in the refrigerator, allow them to come to room temperature before reheating. This helps promote even heating throughout the meat.
- Use a thermometer: To ensure optimal results, use a meat thermometer to monitor the internal temperature of the ribs while they reheat. Insert it into the thickest part of the meat without touching any bones for an accurate reading.
- Reheating times: As a general rule of thumb, allow approximately 20-30 minutes for refrigerated ribs and 30-40 minutes for frozen ones at a low heat setting.
- Check internal temperature: Throughout the reheating process, periodically check the internal temperature of your ribs using a thermometer. You want them to reach an internal temperature of at least 165 degrees Fahrenheit (74 degrees Celsius) for safe consumption.
Maintaining Flavor and Texture
To maintain both flavor and texture when reheating your oven-baked ribs, there are additional tips you should keep in mind:
- Wrap tightly: Before placing the ribs in the oven, tightly wrap them in aluminum foil. This helps seal in moisture and prevent them from drying out.
- Low and slow: Reheating your ribs at a low temperature is key to preserving their tenderness. Avoid using high heat, as it can cause the meat to become tough and chewy.
- Basting for moisture: To add extra moisture and flavor, consider basting your ribs with barbecue sauce or a marinade of your choice during the reheating process. This will help keep them juicy and delicious.
- Resting period: Once your ribs have reached the desired internal temperature, remove them from the oven and let them rest for a few minutes before serving. This allows the juices to redistribute throughout the meat, resulting in a more succulent bite.
By following these time and temperature guidelines, you can enjoy reheated oven-baked ribs that taste just as delightful as when they were first cooked. Remember to use a thermometer to ensure they reach the appropriate internal temperature for safe consumption. With proper technique and attention to detail, you’ll savor every tender bite of your reheated ribs straight from the oven!
Mastering the Art of Oven-Baked Ribs
In conclusion, mastering the art of oven-baked ribs at 350 degrees requires a combination of choosing the right rib style, perfecting the cooking method, and dispelling common misconceptions. By following a step-by-step guide and considering some tips for success, you can enhance your baked ribs experience and enjoy tender, flavorful results.
Choosing between country-style and St. Louis-style ribs is an important first step. Country-style ribs are meatier and more substantial, while St. Louis-style ribs offer a balance between meat and bone. Understanding these differences allows you to select the style that suits your preference.
To achieve fall-off-the-bone tenderness with oven-baked ribs, it is crucial to follow an easy method that involves seasoning, slow cooking, and finishing with a glaze or sauce. This approach ensures that the meat becomes tender while retaining its juiciness.
Dispelling common misconceptions about cooking times is essential. Contrary to popular belief, longer cooking times do not necessarily equate to more tender ribs. Instead, using a lower temperature (such as 350 degrees) for a longer period allows for gradual cooking that results in succulent meat without drying it out.
To prepare delicious oven-baked ribs at 350 degrees, follow our step-by-step recipe guide. From prepping the rack to applying dry rubs or marinades and monitoring cooking time carefully, this comprehensive recipe will help you achieve mouthwatering results every time.
Enhancing your baked ribs experience goes beyond just the main dish itself. Consider pairing them with complementary side dishes such as cornbread or coleslaw to elevate your meal further. Incorporating tips like basting during cooking or adding wood chips for smoky flavor can take your oven-baked ribs to new heights.
If you find yourself with leftover ribs that need reheating, simply follow our time and temperature guidelines for reheating in the oven. This ensures that your ribs retain their tenderness and flavor, allowing you to enjoy them as if they were freshly cooked.
In conclusion, mastering the art of oven-baked ribs at 350 degrees is within reach for anyone willing to put in the effort. By choosing the right rib style, perfecting the cooking method, and dispelling misconceptions, you can create tender and delicious ribs that will impress your family and friends. So why wait? Get started on your journey to becoming a rib connoisseur today!
FAQs
Q: Can I cook ribs at a higher temperature for a shorter time?
A: While it is possible to cook ribs at a higher temperature for a shorter time, this may result in less tender meat. The low and slow method at 350 degrees allows for gradual cooking, ensuring juicy and flavorful results.
Q: How do I know when my ribs are done?
A: You can check the doneness of your ribs by using two methods. First, you can use a meat thermometer to ensure they reach an internal temperature of 145-165 degrees Fahrenheit. Alternatively, you can perform the “bend test” where the meat should easily pull away from the bone without resistance.
Q: Can I use barbecue sauce instead of dry rubs or marinades?
A: Absolutely! Using barbecue sauce instead of dry rubs or marinades is a matter of personal preference. Applying barbecue sauce towards the end of cooking or as a glaze adds a flavorful touch to your oven-baked ribs.
Q: Can I freeze leftover baked ribs?
A: Yes! If you have leftover baked ribs, allow them to cool completely before storing them in an airtight container or freezer bag. They can be stored in the freezer for up to three months.
Q: Can I substitute pork with beef for oven-baked ribs?
A: While pork is the most commonly used meat for oven-baked ribs, you can certainly use beef ribs if desired. Keep in mind that cooking times and techniques may vary slightly, so adjust accordingly for beef ribs.
0 Comments